🇨🇦 Canada Only Guide
This guide is only for Canadian schools who need to comply with Canadian data residency requirements. To view the worldwide version of this guide click here.
Who is this guide for?
- New or existing Hypothesis customers. If you are not yet a customer, please reach out to us here to talk with a member of Education team about using Hypothesis at your school.
- People with administrator-level access to their institution’s Moodle instance
Upgrading an existing Hypothesis LTI 1.1 installation
If you are installing Hypothesis for the first time you can skip this section and begin at Create the Hypothesis external tool.
Moodle allows you to upgrade the existing Hypothesis LTI 1.1 tool to LTI 1.3 directly, without needing to install a new instance of the tool. To ensure that previous Hypothesis assignments made with the old tool continue to work properly, we need to know the LTI 1.1 consumer key of the previous Hypothesis tool.
Follow the steps below to copy the LTI 1.1 consumer key, and then upgrade the existing Hypothesis tool.
1. Open the “Site Administration” page, and in the “Search” field type “manage tools” and hit enter
Under Search results click the Manage tools link.
Note that the typical path to the Manage tools page will be Administration / Plugins / Activity modules / External tool / Manage tools though some Moodle sites may be configured differently.
2. From the “Manage tools” page, locate the exiting Hypothesis tool card and click the gear button in the upper-right to edit the tool’s configuration

3. Under “Tool settings” locate the “Consumer key” and copy its value to a temporary note or text file

You will need to refer to this value later in the upgrade process.
4. Click the drop-down menu for “LTI version” and change the value from “LTI 1.0/1.1” to “LTI 1.3”

5. You may now skip to step 3 in the “Create the Hypothesis external tool” section of this guide below and continue entering the remaining configuration values as directed
Create the Hypothesis external tool
1. Open the “Site Administration” page, and in the “Search” field type “manage tools” and hit enter
Under Search results click the Manage tools link.
Note that the typical path to the Manage tools page will be Administration / Plugins / Activity modules / External tool / Manage tools though some Moodle sites may be configured differently.
2. From the “Add tool” box, click the link to “configure a tool manually”

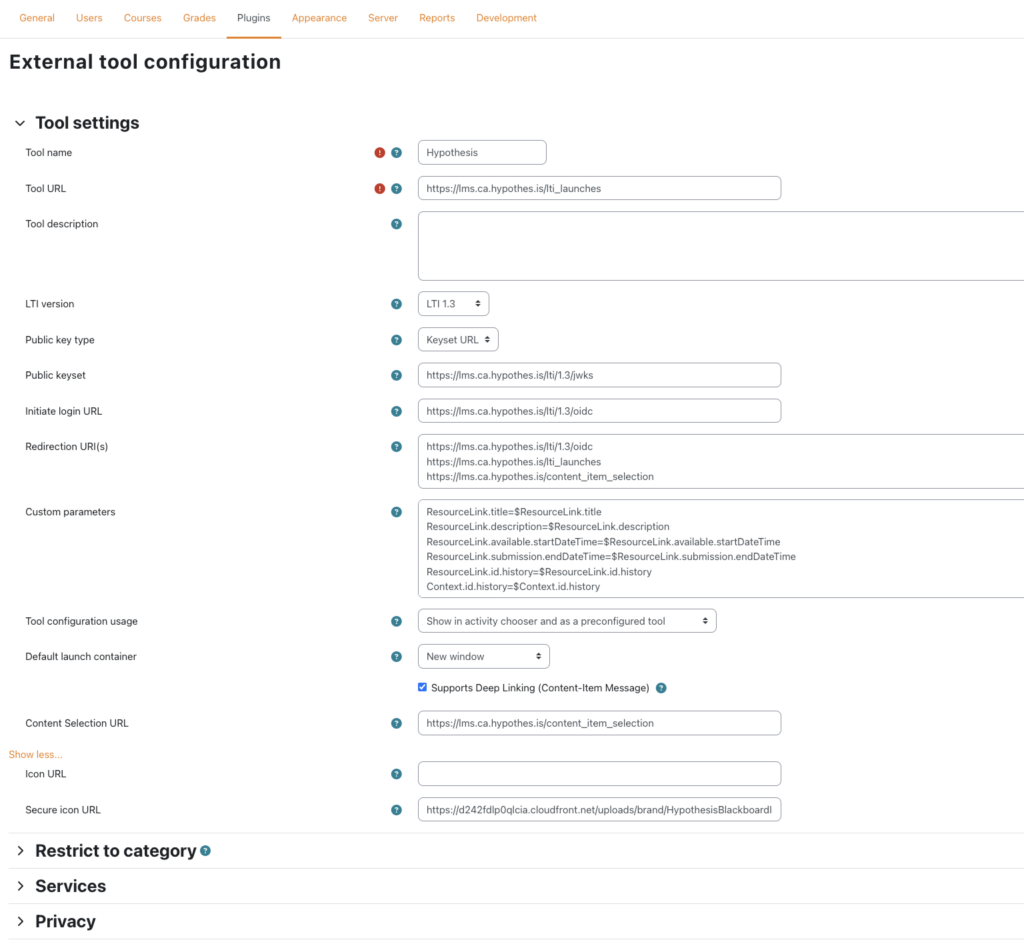
3. Fill out the “External tool configuration” page (start here if you are upgrading an existing LTI 1.1 version of the tool)
Under Tool Setting enter the following:
- Tool Name:
- Hypothesis
- Tool URL:
https://lms.ca.hypothes.is/lti_launches
- LTI version:
- LTI 1.3
- Public key type:
- Keyset URL
- Public keyset:
https://lms.ca.hypothes.is/lti/1.3/jwks
- Initiate login URL:
https://lms.ca.hypothes.is/lti/1.3/oidc
- Redirection URI(s):
-
https://lms.ca.hypothes.is/lti/1.3/oidc
https://lms.ca.hypothes.is/lti_launches
https://lms.ca.hypothes.is/content_item_selection
-
- Custom parameters:
-
ResourceLink.title=$ResourceLink.title
ResourceLink.description=$ResourceLink.description
ResourceLink.available.startDateTime=$ResourceLink.available.startDateTime
ResourceLink.submission.endDateTime=$ResourceLink.submission.endDateTime
ResourceLink.id.history=$ResourceLink.id.history
Context.id.history=$Context.id.history
-
- Tool configuration usage:
- Show in activity chooser as a preconfigured tool (Choose this option whenever available. This is available on newer versions of Moodle. Select the option below if this is not available)
- Show as preconfigured tool when adding an external tool
- Default launch container:
- New window
- Enable Supports Deep Linking (Content-Item Message)
- Content Selection URL
https://lms.ca.hypothes.is/content_item_selection
- (Hidden behind Show more…) Secure icon URL:
https://d242fdlp0qlcia.cloudfront.net/uploads/brand/HypothesisBlackboardIcon.png
Under Services enter the following:
- IMS LTI Assignment and Grade Services:
- Use this service for grade sync only
- IMS LTI Names and Role Provisioning:
- Use this service to retrieve members’ information as per privacy settings
- Tool Settings:
- Do not use this service

Under Privacy enter the following:
- Share launcher’s name with tool:
- Always
- Share launcher’s email with tool:
- Always
- Accept grades from the tool:
- As specified in Deep Linking definition or Delegate to teacher
- ✓ Force SSL

Leave the Miscellaneous section unchanged.
Click the Save changes button to save.
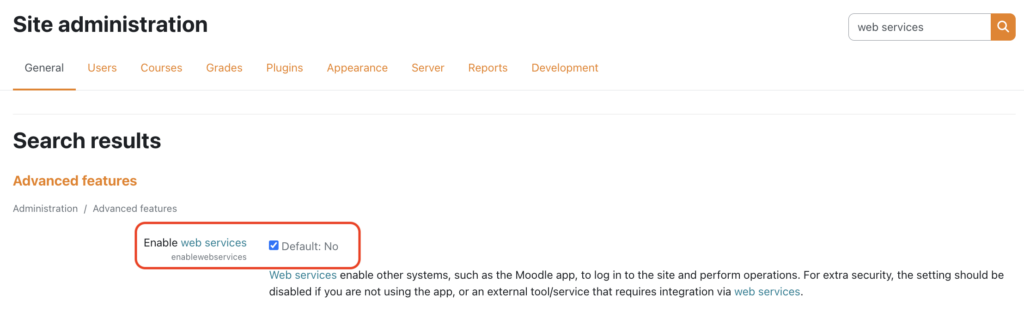
Before proceeding with the steps to set up the Hypothesis API, make sure first that Web Services and REST Protocol are both enabled in your Moodle instance. These are components that should be enabled for the API to function correctly once it has been set up. Here are the steps to check if these two items are enabled.
Web Services
- Click Site Administration and search for Web Services.
- On the results, look for Advanced Features. Enable Web Services will be under that category. Make sure that it is checked.
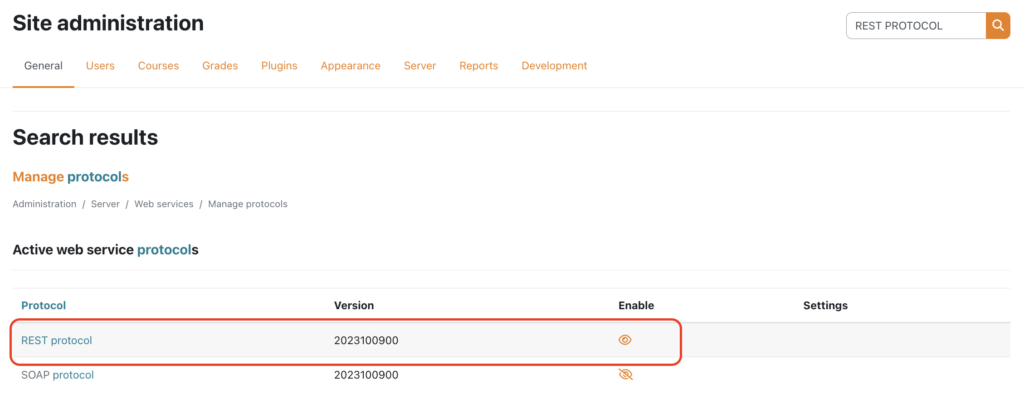
REST Protocol
- Click Site Administration and search for REST Protocol.
- On the results, look for Manage protocols. REST Protocol will be under that category. Make sure that the eye icon across it is not crossed out, suggesting that it is enabled.
API Setup
In this part of the setup, the Moodle admin has to pick a user where the API token will be associated. The admin can use their own user or a generic admin user account. If a new user account will be used, make sure that the new user account is not required to change password or has pending policies (privacy) that needs to be completed. Make sure to have a user that will be associated with the API token ready before proceeding further.
-
Role Creation
- Open the “Site Administration” page, and in the “Search” field type “Define Role” and hit enter.
- Under Search results click the Define Roles link.
Note: The typical path to the Define Roles page will be Administration / Users / Permissions / Define Roles though some Moodle sites may be configured differently.
-
- Click Add a New Role.
- Click Continue.
- Fill out the “Adding a New Role” page using the guide below.
-
-
- Short Name:
- Hypothesis
- Custom Full Name
- Hypothesis
- Role archetype
- None
- Context types where this role may be assigned
- System
- Allow role assignments
- None
- Allow role overrides
- None
- Allow role switches
- None
- Allow role to view
- None
- Capabilities
moodle/course:managegroupsmoodle/course:viewmoodle/course:ignoreavailabilityrestrictionsmoodle/course:viewhiddencourses
- Short Name:
-
-
- Click Create this Role.

-
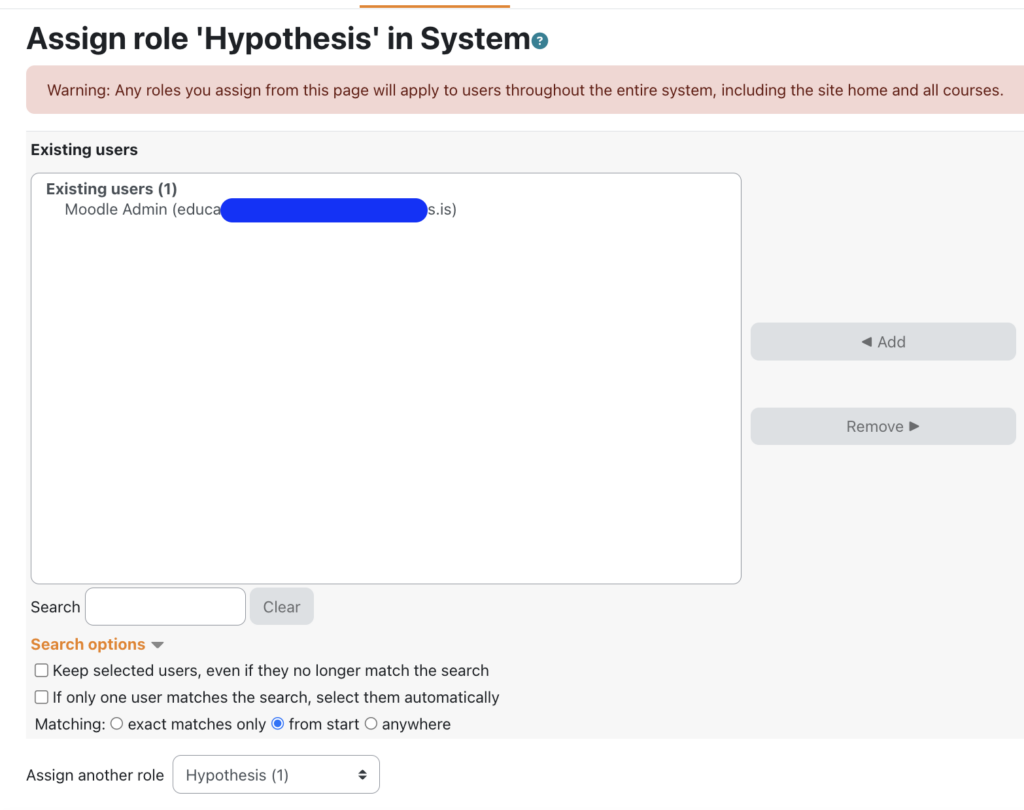
- Open the “Site Administration” page, and in the “Search” field type “Assign system roles” and hit enter.
- Under Search results click the Assign System Roles link.
- Click the role that was earlier created in steps a-f.
- Select the name of the user account that you will be associating this role with and click Add.
-
External Service
- Open the “Site Administration” page, and in the “Search” field type “External Service” and hit enter.
- Under Search results click the External Services link.
Note: The typical path to the Define Roles page will be Administration / Server / Web Services / External Services though some Moodle sites may be configured differently.
-
- Click Add.
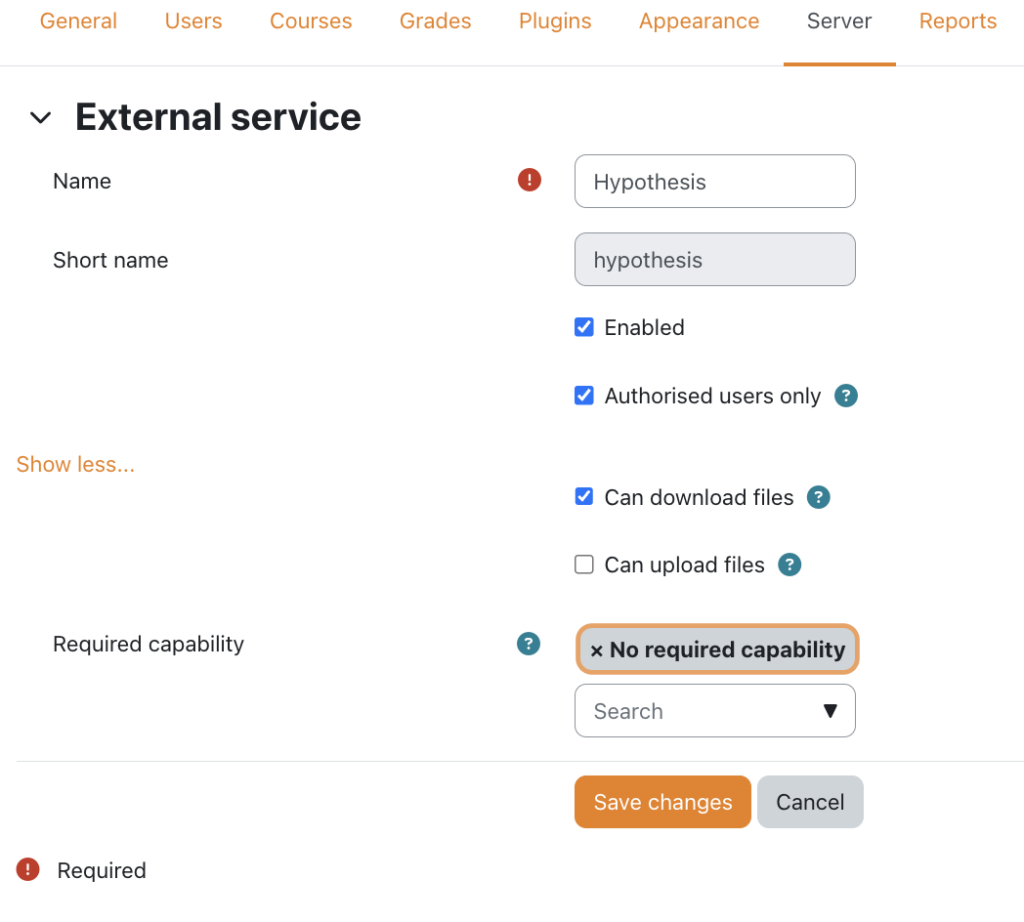
- Fill out the “External Service” page using the guide below.
-
-
- Name:
- Hypothesis
- Short Name
- Hypothesis
- Click Show more… and enable the following:
- Enabled
- Authorized users only
- Can download files
- Required Capability
- No Required Capability
- Name:
-
-
- Click Save Changes.
- Click Add Functions.
- Click the dropdown arrow and locate each function listed below. Click the function on the results list to include it as a function.
- Click Save Changes.
-
-
core_course_get_contentscore_group_get_course_groupingscore_group_get_course_user_groupscore_group_get_groupingsmod_page_get_pages_by_courses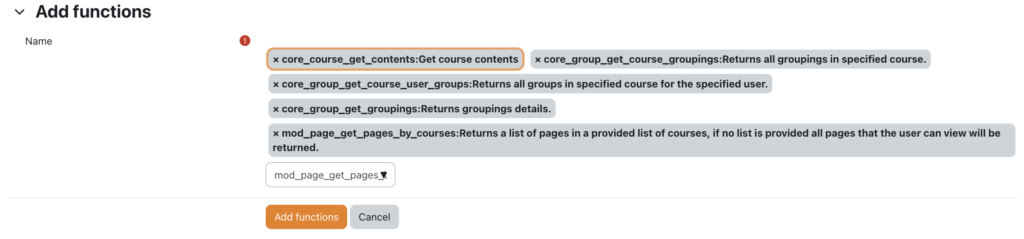
-
-
-
- Click Add Functions.
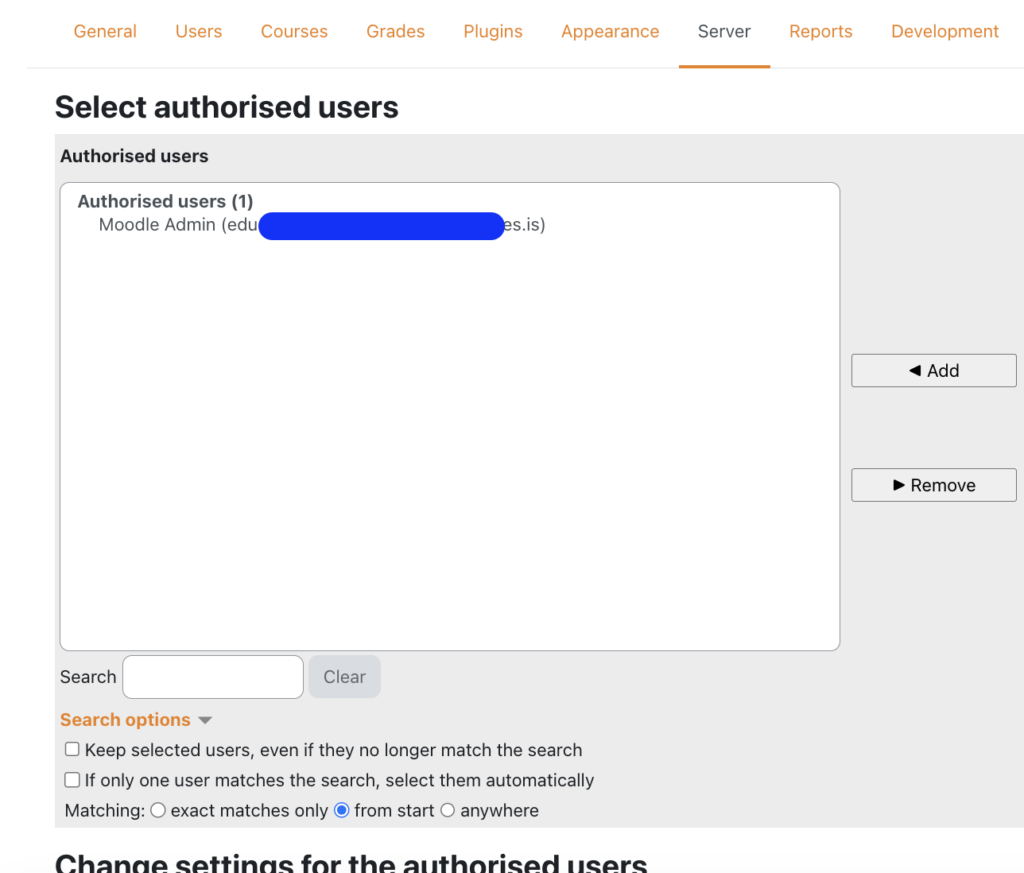
- Go back to External Services by opening the “Site Administration” page, and in the “Search” field type “External Service ” and hit enter. Under Search results click the External Services link.
- Locate the External Service that has just been created and click the Authorized Users link across it.
- Select the user that will be associated with the API token that you will be creating in the next set of steps.
- Click Add.
-
-
API Token Creation
- Open the “Site Administration” page, and in the “Search” field type “Manage Token” and hit enter.
- Under Search results click the Manage Tokens link.
Note that the typical path to the Define Roles page will be Administration / Server / Web Services / Manage Tokens though some Moodle sites may be configured differently. - Click Create Token.
- Fill out the “Create Token” page using the guide below.
- Name:
- Hypothesis
- User
- Select the user where this API token will be associated with
- Service
- Hypothesis (this is the External Service you earlier selected)
- Uncheck the box across Valid Until
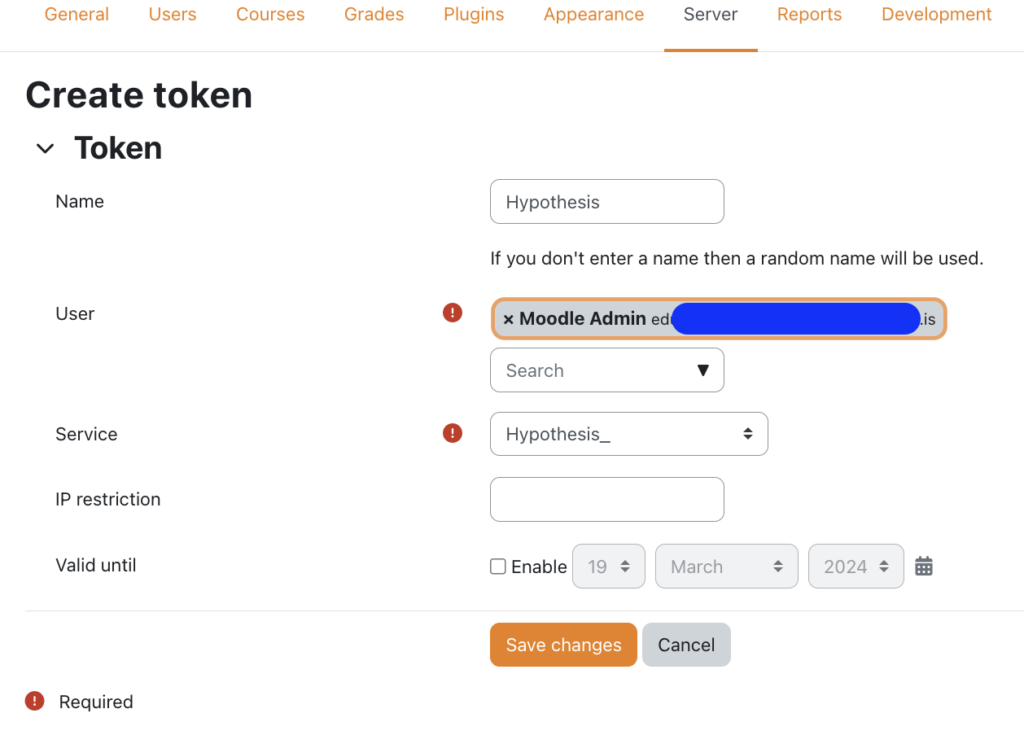
- Name:
-
- Click Save Changes.
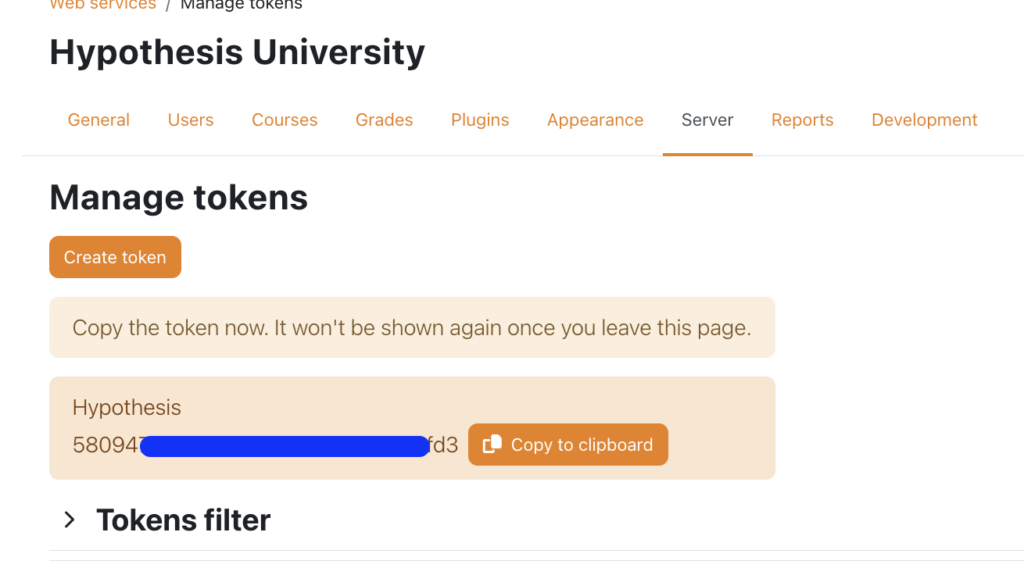
- Click Copy to Clipboard to copy your API token. Make sure to save a copy of it since you will not be able to retrieve the API token within Moodle once you leave the Manage Tokens Page.
Submit LTI details to Hypothesis to complete registration
- From the “Manage tools” page, locate the Hypothesis tool and click the “View configuration details” button in the upper right

- In the “Tool configuration details” window, note the “Platform ID”, “Client ID”, and “Deployment ID” values

You will need to copy each of these values into our registration form during the steps below.
- In a new browser tab, open our LTI 1.3 / Advantage Registration form.
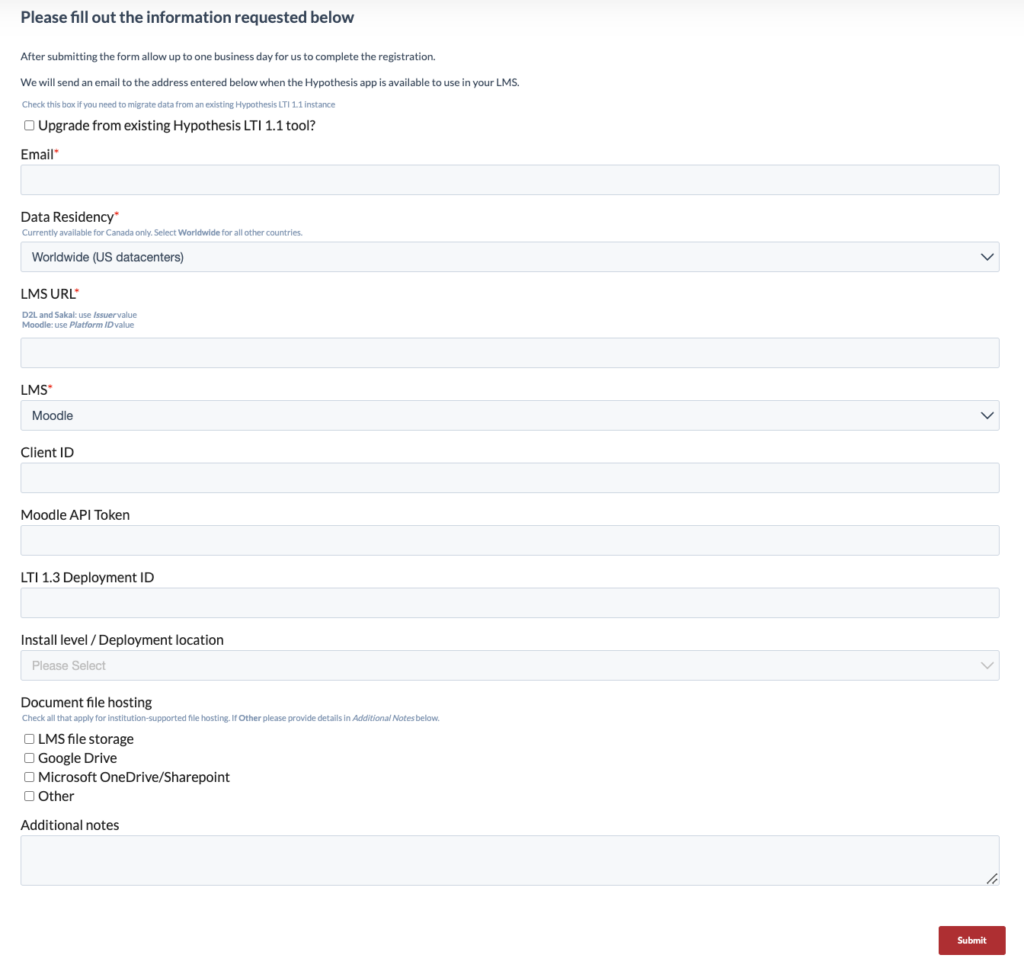
If you are upgrading an existing LTI 1.1 Hypothesis tool, check the box “Migrate from existing LTI 1.1?” and paste the previous LTI 1.1 consumer key into the text box

- Enter the following values into the form as shown
- Email
- Your email address, or another address that you want associated with this registration
- LMS URL
- Enter the Platform ID value copied from the Tool configuration details window above
- LMS
- Select Moodle from the drop-down menu
- Client ID
- Enter the Client ID value copied from the Tool configuration details window above
- Moodle API Token
- Enter the API token you copied when you setup the API token in Moodle
- Deployment ID
- Enter the Deployment ID value copied from the Tool configuration details window above
- Click the “Submit” button to send your LTI info to Hypothesis.
We will email the address you provided above when your registration has been processed and Hypothesis is ready to be used. We can’t wait to have you annotating!
Important note: Hypothesis will not be available to use in courses until you have received confirmation that we have processed your LTI instance.