🇨🇦 Canada Only Guide
This guide is only for Canadian schools who need to comply with Canadian data residency requirements. To view the worldwide version of this guide click here.
Who is this guide for?
- New or existing Hypothesis customers. If you are not yet a customer, please reach out to us here to talk with a member of the Education team about using Hypothesis at your school.
- People with administrator-level access to their institution’s D2L/Brightspace instance
Upgrading an existing Hypothesis LTI 1.1 installation
If you are currently using the LTI 1.1 version of Hypothesis, we recommend that you follow the instructions below to install a new LTI 1.3 version of Hypothesis, and continue to keep this old LTI 1.1 version of the tool in-place, rather than follow D2L’s instructions for migrating the tool to LTI 1.3.
After install, all new Hypothesis reading assignments will default to using the new version of the tool, while any older Hypothesis assignments created using the previous version will continue to use the old tool, resulting in as little disruption as possible.
It is important that you not delete the LTI 1.1 version from D2L, otherwise previous Hypothesis assignments created with the old tool will break.
Register Hypothesis as an LTI Tool
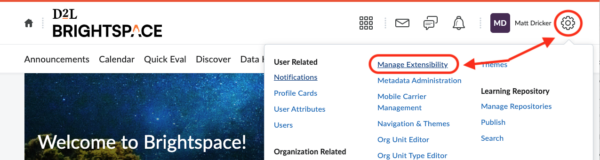
1. From the Admin Tools menu, click on “Manage Extensibility”
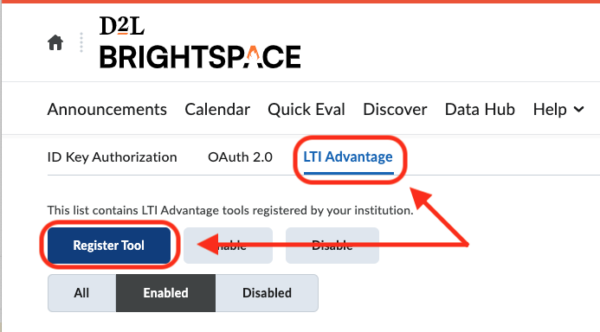
2. Select the “LTI Advantage” tab, and click the “Register Tool” button
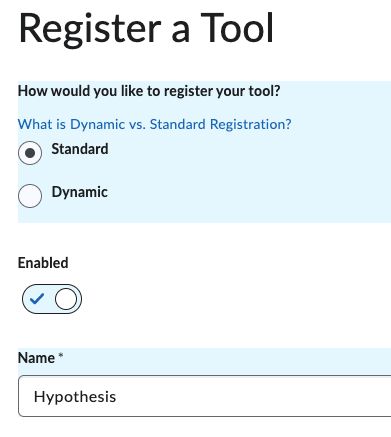
3. Select “Standard” Registration, then enter “Hypothesis” for the Name
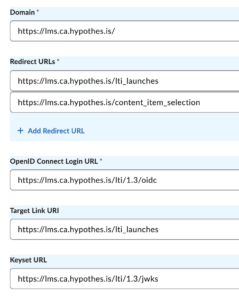
4. Enter the following values in the fields as shown:
- Domain
https://lms.ca.hypothes.is
- Redirect URIs
https://lms.ca.hypothes.is/lti_launcheshttps://lms.ca.hypothes.is/content_item_selection
- OpenID Connect Login URL
https://lms.ca.hypothes.is/lti/1.3/oidc
- Target Link URI
https://lms.ca.hypothes.is/lti_launches
- Keyset URL
https://lms.ca.hypothes.is/lti/1.3/jwks
5. Make sure the following values are selected and checked
- Extensions
- ✓ Assignment and Grade Services
- ✓ Names and Role Provisioning Services
- Roles
- ✓ Send Institution Role

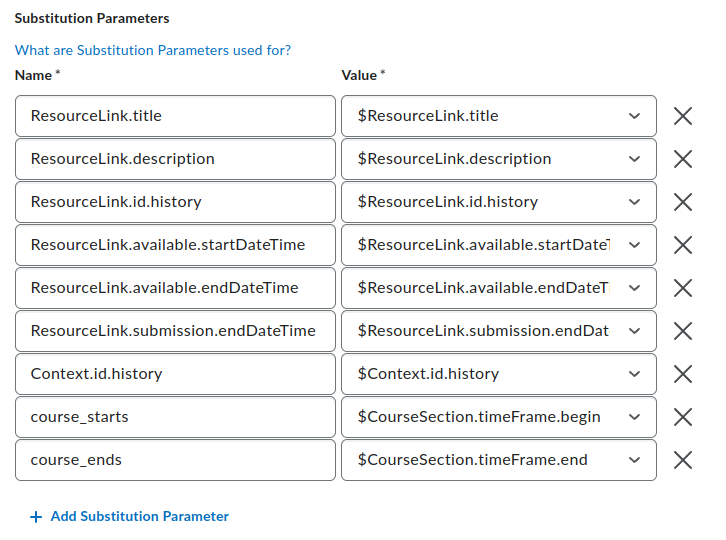
6. Add the following Substitution Parameters Name : Value combinations
ResourceLink.title : $ResourceLink.titleResourceLink.description : $ResourceLink.descriptionResourceLink.id.history : $ResourceLink.id.historyResourceLink.available.startDateTime : $ResourceLink.available.startDateTimeResourceLink.available.endDateTime : $ResourceLink.available.endDateTimeResourceLink.submission.endDateTime : $ResourceLink.submission.endDateTimeContext.id.history : $Context.id.historycourse_starts : $CourseSection.timeFrame.begincourse_ends : $CourseSection.timeFrame.end
Leave the Custom Parameters section blank. No custom parameters are needed.
7. Click the “Register” button to register the tool
8. From the “Registration Details” pop-up window, copy the following values
- Client ID
- Issuer

Paste these values into a separate temporary note or text document. You will need to supply them to Hypothesis later in the installation process.
Register a Hypothesis OAuth 2.0 app
Registering a Hypothesis OAuth 2.0 app in D2L allows Hypothesis full integration with D2L groups, providing instructors with more flexibility in configuring group-based Hypothesis reading assignments.
1. From the Admin Tools menu, click on “Manage Extensibility”
2. Select the “OAuth 2.0” tab and click the “Register an app” button

3. Enter the following values for the fields as shown:
- Application Name
Hypothesis
- Redirect URI
https://lms.ca.hypothes.is/api/d2l/oauth/callback
- Scope
content:file:read content:toc:read content:topics:read groups:group:read
- Access Token Lifetime
3600(the default)

Make sure the following check-boxes are selected:
- ✓ Prompt for user consent
- ✓ Enable refresh tokens
- ✓ I accept the Non-Commercial Developer Agreement
Click the Register button to save.

4. Copy the following values from the displayed page below:
- Client ID
- Client Secret

Paste these values into the same temporary note or text document you used earlier, making sure to differentiate this OAuth 2.0 app Client ID from the LTI Client ID copied earlier.
D2L API Endpoints used by Hypothesis
The following is a list of the D2L API endpoints used by Hypothesis:
- Retrieve a list of all the group categories for the provided org unit:
/d2l/api/lp/(version)/(orgUnitId)/groupcategories/
- Retrieve a list of all the groups in a particular group category for an org unit:
/d2l/api/lp/(version)/(orgUnitId)/groupcategories/(groupCategoryId)/groups/
- Retrieve the list of available files in a course’s table of contents:
/d2l/api/le/(version)/(orgUnitId)/content/toc
- Retrieve metadata for one individual file:
/d2l/api/le/(version)/(orgUnitId)/content/topics/(topicId)
- Access to the byte stream of one individual file:
/d2l/api/le/(version)/(orgUnitId)/content/topics/(topicId)/file
Create a Hypothesis Deployment
1. Open the Admin Tools menu and click on “External Learning Tools”

2. Select the “LTI Advantage” tab, and click the “New Deployment” button

3. In the Deploy Tool page, select “Hypothesis” from the registered tool drop-down menu
Enter Hypothesis in the Name field, and give it an optional description. Suggested: “Help students read more deeply by engaging in discussions right on top of the content.”

4. Confirm that the following Extensions are checked
- ✓ Assignment and Grade Services
- ✓ Names and Role Provisioning Services

5. Under “Security Settings” make sure the following values are selected and checked
- ✓ Org Unit Information
- ✓ Name
- ✓ First Name
- ✓ Middle Name
- ✓ Last Name
- ✓ User ID
- ✓ Username
- ✓ Org Defined Id
- ✓ Link Information
- ✓ Title
- ✓ Description
- ✓ Classlist including users not known to this deployment

6. Under “Configuration Settings” make sure the following values are selected and checked
- ✓ Open as External Resource
- ✓ Grades created by LTI will be included in Final Grade
- ✓ Auto Create Grade Items

Leave Substitution Parameters and Custom Parameters blank.
7. Click the Add Org Unit button to make the tool provider available to the desired org unit(s)
Locate the appropriate org unit to use, and be sure to select the option to make tool available to All descendants unless you are restricting Hypothesis to the top level org unit only.
Click the Add button.

8. Click the “Create Deployment” button to create the Hypothesis deployment

9. From the “Deployment Details” pop-up window, copy the Deployment ID

Paste this value into the same temporary note or text document you used earlier, adding it to the values previously copied.
Allow instructors to create deep links to Hypothesis-enabled readings
1. Under the “Deployment Details”, click “View Links”

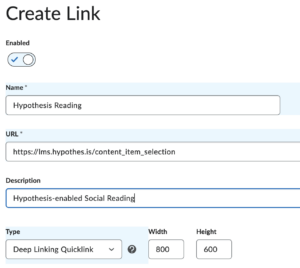
2. Click “New Link” and enter the following information
- Name: Hypothesis Reading
- URL:
- Worldwide: https://lms.hypothes.is/content_item_selection
- 🇨🇦 Canada: https://lms.ca.hypothes.is/content_item_selection
- Description: Hypothesis-enabled Social Reading
- Type: Deep Linking Quicklink
- Width: 800
- Height: 600
3. Click “Save and Close”
Submit LTI details to Hypothesis to complete registration
1. Gather the text document you copied the LTI values into during the above steps


You will be pasting these values into our form below.
2. Open our LTI 1.3 / Advantage Registration form

3. Enter the following values into the form as shown
- Email
- Your email address, or another address that you want associated with this registration
- LMS
- Select D2L from the drop-down menu
- LMS URL
- Enter the Issuer value previously copied from above
- Client ID
- Enter the LTI Client ID value previously copied from above
- OAuth 2.0 Client ID
- Enter the OAuth 2.0 Client ID value previously copied from above
- OAuth 2.0 Client Secret
- Enter the OAuth 2.0 Client Secret value previously copied from above
- Deployment ID
- Enter the Deployment ID value previously copied from above
4. Click the “Submit” button to send your LTI info to Hypothesis
We will email the address you provided above when your registration has been processed and Hypothesis is ready to be used. We can’t wait to have you annotating!
Important note: Hypothesis will not be available to use in courses until you have received confirmation that we have processed your LTI instance.