Who is this article for?
This article is for users who want to create annotations, comments, and other notes using the Hypothesis annotation editor.
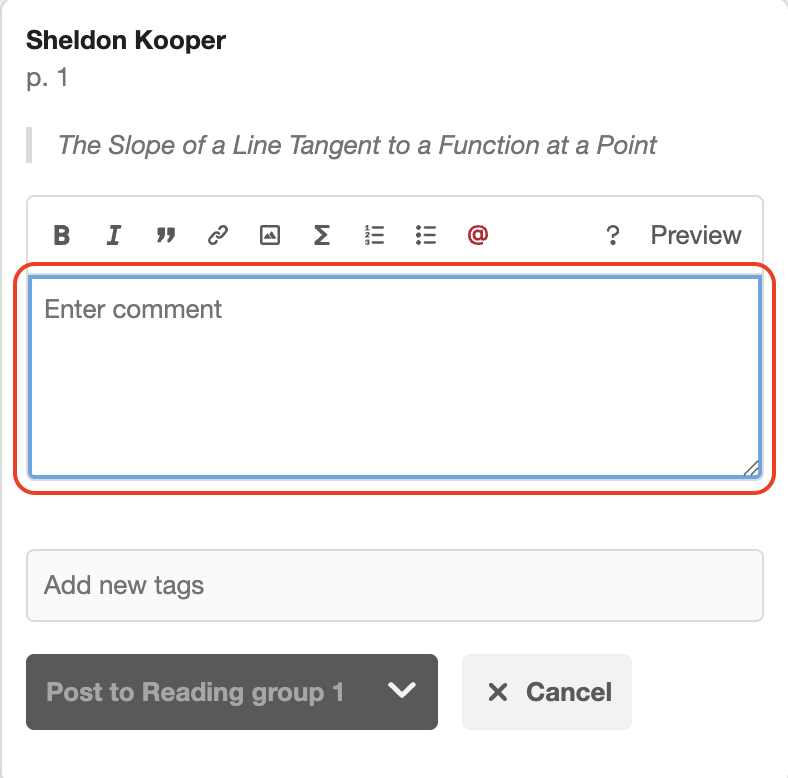
Where do I create comments?
The comment field is the open text box below the formatting toolbar.
What is the annotation editor?
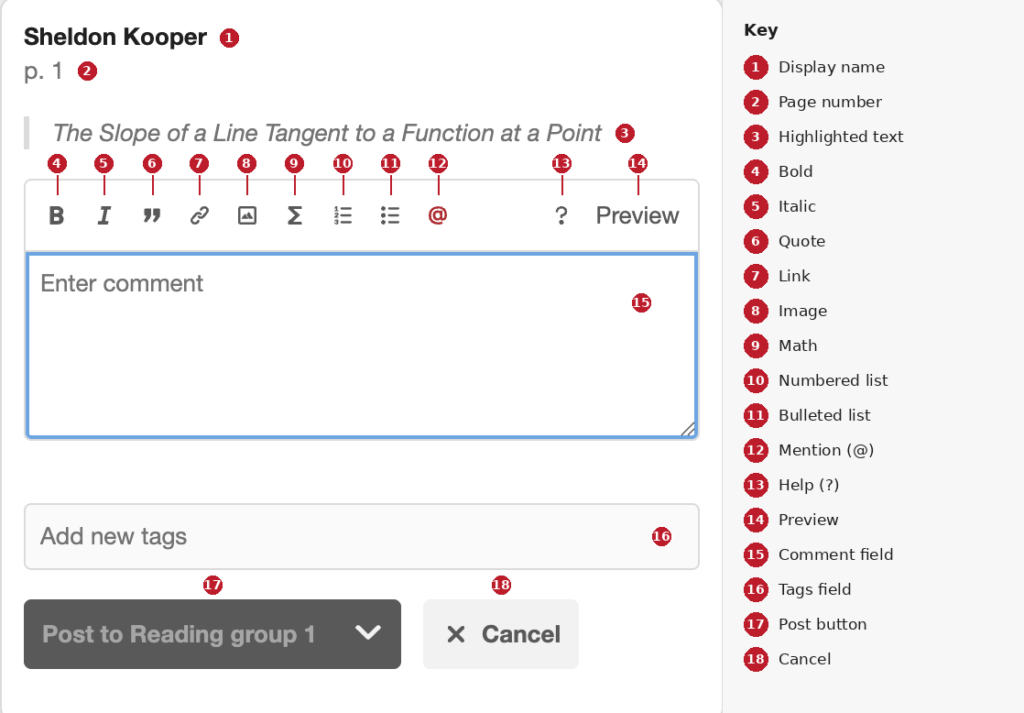
The annotation editor opens in the Hypothesis sidebar when you highlight text and select Annotate. It’s where you write your comment, format it, and preview it before posting.
From top to bottom, the editor shows:
- Your display name: the name other users will see on your annotation.
- The page number: the page where the highlighted text appears. This shows on PDFs and some ebooks.
- The highlighted text: the passage you selected, shown as a gray quote.
- The formatting toolbar: buttons for formatting your comment, plus Help (?) and Preview on the right.
- The comment field: the box where you type your comment. It reads “Enter comment” until you start typing.
- The tags field: where you can add optional tags.
- The Post and Cancel buttons: for posting your annotation or discarding it.
How to use the annotation editor?
Writing in the comment field
Everything you write goes into the comment field, the large box below the toolbar. Click inside it and start typing. You can drag the bottom-right corner to make the box bigger.
Note: The toolbar buttons don’t format text on their own. They add formatting symbols (Markdown) into the comment field around your text. For example, bolding the word great puts **great** in the field. The symbols disappear when you preview or post the annotation.
Using the formatting toolbar
Select text in the comment field, then click a button to format it. If nothing is selected, the button adds placeholder text you can type over.
Bold (B)
Makes text bold. Adds **text** to the comment field.
Italic (I)
Makes text italic. Adds *text* to the comment field.
Quote (”)
Formats text as a block quote. Adds > text to the comment field.
Link (chain icon)
Turns text into a clickable link. Adds [text](https://example.com) to the comment field. Replace the placeholder address with the link you want.
Image (picture icon)
Embeds an image from a web address. Adds  to the comment field.
Note: The image must already be online. You can’t upload image files from your computer.
Math (Σ)
Adds a math formula written in LaTeX. Adds $$formula$$ to the comment field.
Numbered list (1, 2, 3)
Starts a numbered list. Adds 1. item to the comment field.
Bulleted list
Starts a bulleted list. Adds * item to the comment field.
Mention (@)
Mentions another member of the group so they’re notified. Type @, then pick a name from the list that appears.
Using Help and Preview
- Help (?): opens a guide to the formatting options, including how to type the symbols by hand.
- Preview: shows your comment the way others will see it, with formatting applied and symbols hidden.
Note: You can’t type while in Preview. Click Write to go back to editing.
Adding tags
Tags are optional. Type a tag in the tags field and press Enter to add it.
Posting or canceling your annotation
- Post: saves your annotation and shares it with the group named on the button, for example Post to Reading group 1. Click the arrow on the right side of the button to choose a different option, such as Only Me to keep the annotation private.
- Cancel: closes the editor and discards what you’ve written.
Note: Your annotation isn’t saved until you click Post.